 how-to
How Do You Arrange Portraits on a Gallery Wall?
Last Updated: October 30, 2026
Quick Summary
Arrange portraits on a gallery wall by choosing the wall first, then measuring it and picking one focal portrait to anchor the grouping. Plan the layout on paper with templates before drilling, keep spacing between frames consistent at about 2 to 3 inches, and hang the center of the grouping at eye level.
- Measure the full wall and mark windows, doors, and outlets before choosing frame sizes.
- Place your strongest, largest portrait near the center of the grouping as the focal point.
- Keep the gaps between frames equal, usually 2 to 3 inches, on every side.
- Hang the center of the grouping at eye level, about 57 inches from the floor for most adults.
- Test the layout with paper templates taped to the wall and check it from across the room.
Table of Contents
- Start With the Wall, Not the Frames
- Measuring Your Wall Space and Choosing a Focal Point
- Gallery Wall Layout Ideas for Portraits
- How to Plan a Gallery Wall Layout on Paper
- Gallery Wall Spacing Between Frames
- How High to Hang Framed Portraits
- Lighting, Tools and Hanging Hardware
- Mixing Portrait Sizes, Finishes and Themes
- Booking Your Senior Portrait Session for the Wall
- Frequently Asked Questions
Start With the Wall, Not the Frames
Arranging senior portraits on a gallery wall starts with the wall itself. Choose the wall first, then decide what goes on it. A well-planned wall makes a high school senior's portraits look like a deliberate collection, not a row of photos that happened to fit.
Gallery walls work best when the portraits feel personal and considered. A 2026 gallery wall trend article describing personal, eclectic arrangements reports that the look has moved away from perfectly matched frames and precisely measured layouts. You do not need identical frames to make a strong wall.
Before you buy anything, decide whether the portraits deserve a permanent home. Many families find that fine art prints, not digital files alone, change how a wall feels. If you are weighing that choice, read how to decide if professional prints matter in 2026 before you plan the layout.
Keep the wall simple to start. Pick one wall in a room you use every day, such as a stairwell, hallway, or living room. Choose a wall that gets natural light and has a clear view from the main entry.
If the portraits are the senior's, think about the senior too.
Measuring Your Wall Space and Choosing a Focal Point
Measure the wall before you choose frame sizes. Note the width and height of the wall and any fixed features, such as windows, doors, outlets, or a fireplace. Mark these on a sketch.
Next, choose a focal point. This is the portrait that anchors the wall. Place your strongest image, usually the largest or most striking one, near the center of the grouping or slightly above it.
Use these steps:
- Measure the full wall from corner to corner.
- Mark any windows, doors, and outlets.
- Pick the focal portrait and its size.
- Decide whether the grouping will be centered or off-center.
- Note the furniture that sits below the wall.
A focal point gives the eye a place to land. Without one, the wall reads as scattered. Keep the focal portrait large enough that it reads clearly from across the room.
Gallery Wall Layout Ideas for Portraits
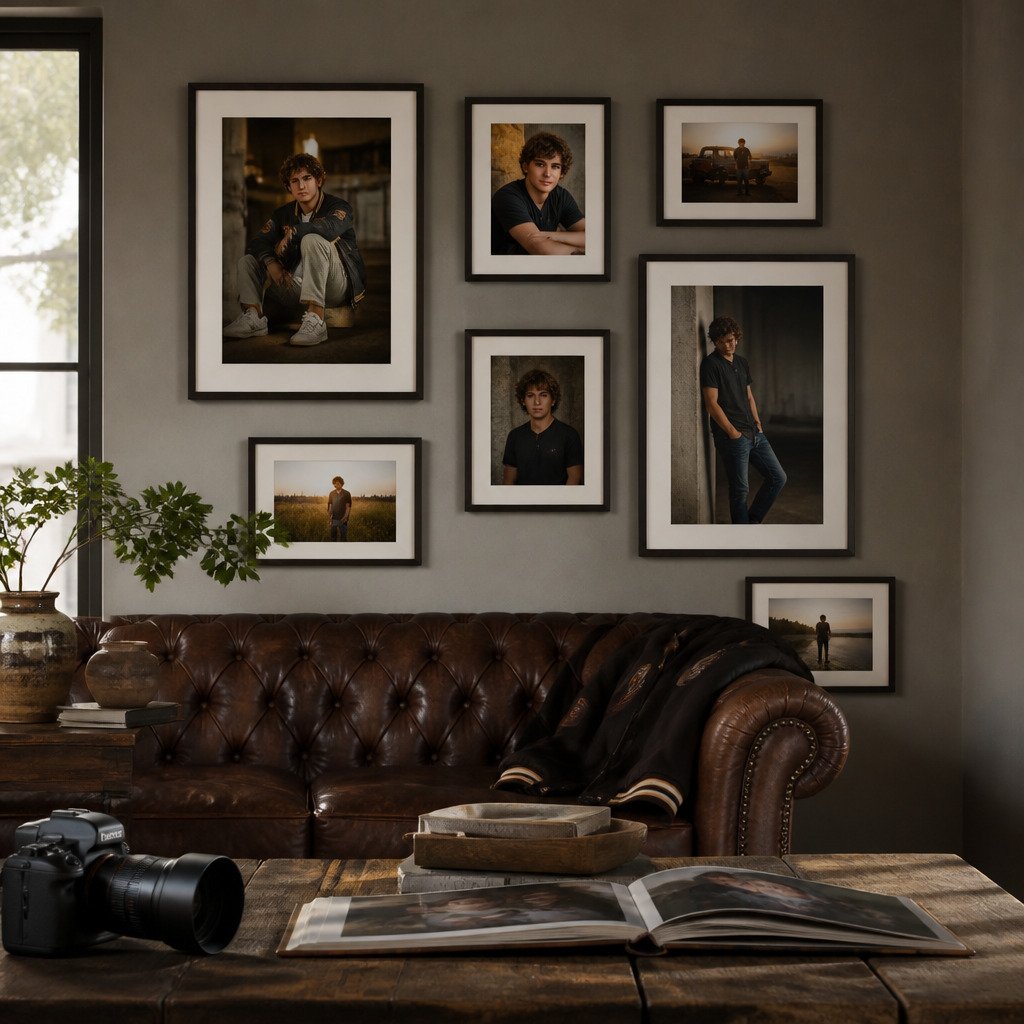
Choose a layout style before you cut paper or drill holes. See senior portrait wall art ideas for your home for examples of how portraits look on a wall. Each style suits a different room and a different family.
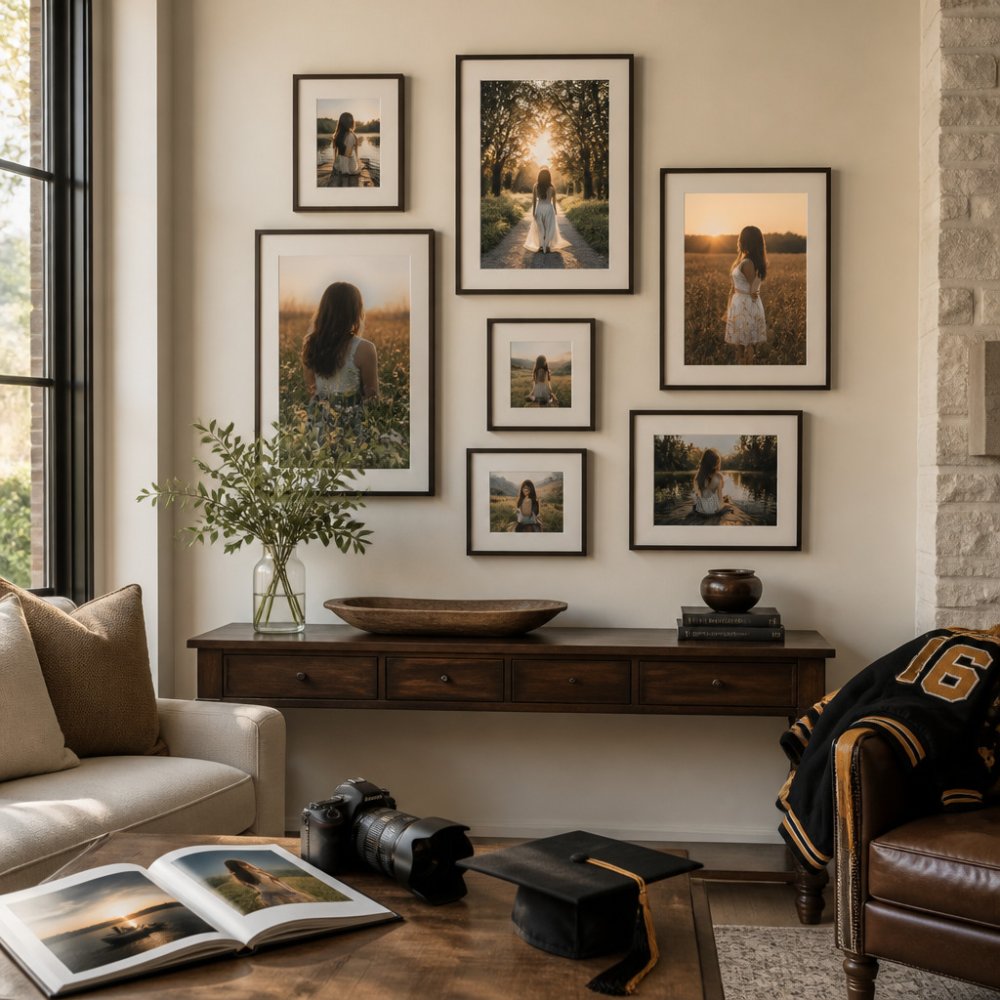
Common layouts for senior portraits:
- Grid: Frames in even rows and columns. Clean and formal.
- Salon style: Frames packed closely in an irregular pattern. Warm and collected.
- Single row: Frames hung in one straight line at eye level. Good for narrow walls.
- Staircase: Frames that follow the slope of a stair. Works well for a senior's growth over time.
- Asymmetrical: One large portrait balanced by several smaller ones on one side.
A grid suits a senior whose portraits share a single style. A salon style suits a wall with several moods, such as a casual outdoor image beside a formal studio portrait. Start with one of these five layouts and adjust from there.
!Living room wall with framed high school senior portraits in mixed sizes
How to Plan a Gallery Wall Layout on Paper
Planning on paper prevents most mistakes. It costs nothing and lets you move frames before you put a nail in the wall.
Creating a Paper Template Step by Step
- Trace each frame on kraft paper or newsprint and cut it out.
- Label each paper template with the portrait it represents.
- Tape the templates to the wall with painter's tape.
- Move the templates until the grouping feels balanced.
- Step back and check the arrangement from across the room.
- Mark the final nail positions through the center of each template.
Keep the templates loose until the arrangement feels right. Leave a few inches of space between templates so you can see the gaps clearly.
Previewing the Layout Digitally
Digital previews help you test ideas faster. Some people photograph the wall, then drop images of the framed portraits into the photo. Others use a room planning app to place frames on a wall photo.
Digital previews are useful for:
- Testing different frame sizes before you buy
- Comparing two layouts side by side
- Sharing a plan with family members who are not in the room
Check that the preview uses true frame sizes. A preview with wrong measurements will mislead you.
Gallery Wall Spacing Between Frames
Spacing decides whether a gallery wall feels unified. Keep the gaps between frames consistent. A gallery wall guide from Inkaa Art House recommends keeping frame gaps at 2 to 3 centimeters, roughly 1 inch, for a tight, cohesive look. Frameology's 2026 layout guide suggests a similar 2 to 3 inch spacing for family photo walls. 2026 family photo gallery wall guide recommending 2 to 3 inch frame spacing
Use these spacing rules:
- Keep gaps between frames equal, usually 2 to 3 inches.
- Use the same gap on every side of every frame.
- Widen the gaps slightly for larger frames, but keep them consistent across the wall.
- Align the bottom edge of a row of frames when the layout calls for it.
Measure gaps with a ruler, not by eye. Small differences add up quickly across a large grouping.
How High to Hang Framed Portraits
Hang portraits so the center of the grouping sits at eye level. For most adults, that puts the center near 57 inches from the floor.
Adjust the height for the room:
- Hang higher above a sofa, leaving about 6 to 8 inches between the sofa back and the bottom frame.
- Hang lower in a hallway if the viewer will be standing close.
- Keep the grouping centered on the wall, not the ceiling.
Check the height with a level before you mark each nail. A level frame looks intentional, and a tilted one stands out right away.
Lighting, Tools and Hanging Hardware
Light decides whether a framed senior portrait reads as fine art or as a snapshot on a wall. Most gallery wall guides stop at "avoid direct sun." That is not enough for museum-quality prints. Treat light as a planning decision, not an afterthought.
Reading the Light on Your Wall
Watch the wall at three times of day before you commit: morning, mid-afternoon, and evening. Note where the sun lands and for how long. A wall that takes two hours of hard western sun each afternoon will fade any print over time, no matter how good the frame. A wall that takes soft, indirect light all day shows skin tones and color most accurately.
A few working rules:
- Keep framed portraits out of direct sun for more than an hour or two a day.
- Prefer north-facing or interior walls for the main grouping.
- Avoid hanging portraits directly opposite a bright window, where glare will wash out the image from the viewer's seat.
- Keep portraits away from bathrooms and kitchens, where humidity swings do more damage than light.
Choosing Glass That Protects the Print
Glass is where most buyers underspend. Standard clear glass transmits nearly all UV and does nothing to stop fading. Two upgrades are worth the conversation at the framing counter:
- UV-filtering glass blocks the majority of ultraviolet light and is the single best defense against fade for a portrait you intend to keep for decades.
- Anti-reflective glass cuts glare so the portrait stays readable across a bright room. It matters most on walls that face a window or sit under a pendant light.
Ask the framer to confirm the UV rating on the glass, not just the name. A frame that protects the print is worth more than a frame that only looks good on day one.
Lighting the Wall Itself
If the wall sits in a dim hallway or a room without good daylight, add light deliberately. Two approaches work well for portrait walls:
- Picture lights mounted above the frame wash the portrait evenly and draw the eye to the focal image.
- Adjustable track lighting lets you aim light at each frame and re-aim it when the layout changes.
Aim light at the portrait, not at the glass. A beam that hits the glass at a shallow angle throws glare back at the viewer. A beam that hits the print at a steeper angle shows the image cleanly.
Tools and Hanging Hardware
Gather these tools before you hang the wall:
- Tape measure and a 24-inch level
- Painter's tape and kraft paper for templates
- Stud finder for heavier frames
- Pencil and small hammer
- Picture wire and D-rings for each frame
- Wall anchors rated for the frame's weight
Use D-rings and picture wire for large frames. Use sawtooth hangers only for light frames. Check the weight rating on every hook and anchor before you hang a frame, and anchor into studs whenever a frame is heavy enough to pull drywall.
Protecting the Print Over Time
Fine art prints are not indestructible. Keep them out of humid rooms, away from heat sources, and out of direct sun. Dust frames with a dry microfiber cloth rather than a wet one, and never spray cleaner onto the glass. When a portrait needs to come down for cleaning or repainting, store it flat and face up, wrapped in acid-free paper, not leaned against a wall in a garage.
A portrait wall is a long-term investment. The light and glass decisions you make on hanging day determine whether the senior's portraits look the same in twenty years as they do the week they come home.
Mixing Portrait Sizes, Finishes and Themes
Mixing is where most portrait walls succeed or fail. Compare heirloom senior portrait collections that combine wall portraits, books, and matted prints. The question is not whether to mix. It is how much to mix, and what holds the mix together. A wall of senior portraits should look collected, not assembled from a sale bin.
Start With One Decision: Matched or Collected
There are two honest approaches, and both work. Pick one before you buy a single frame.
Matched. Every frame shares the same finish, profile, and mat width. The portraits do the talking. Matched walls read as formal, calm, and deliberate. They suit a senior whose portraits share a single session, a single mood, and a single palette, and they suit formal rooms such as a dining room or a stair hall.
Collected. Frames vary in size, finish, and age, and the wall grows over time. Collected walls read as warm and personal. They suit a senior whose portraits span locations and outfits, and they suit lived-in rooms such as a hallway or a family room.
The mistake is drifting between the two. A wall that is mostly matched with one odd frame looks like a mistake. A wall that is mostly collected with one perfectly matched frame looks like a placeholder. Commit to one and let the other elements follow.
The Rule That Holds a Mixed Wall Together
If you go collected, one element must repeat across every frame. Choose one anchor and keep it constant:
- Frame color. All black, all natural wood, all warm brass. The finish can vary; the color family cannot.
- Mat width. A consistent mat border, usually 2 to 3 inches, gives every portrait the same breathing room even when frame sizes differ.
- Subject treatment. All portraits in the same color grade, or all in the same tonal family, so the wall reads as one body of work.
Pick one anchor. Two is fine. Three is where a wall starts to feel noisy.
Sizing a Mixed Wall
A mixed wall needs a clear hierarchy, not a random scatter. A reliable pattern for senior portraits:
- One large focal portrait, roughly twice the area of the next largest frame.
- Two to four medium frames that support the focal image.
- Several small frames that fill gaps and add rhythm.
Keep the size range within two to three steps. A wall with a 24 by 36 inch focal portrait, a pair of 16 by 20 inch frames, and a cluster of 8 by 10 inch frames reads as intentional. A wall that jumps from 30 by 40 inches down to 5 by 7 inches reads as accidental.
Matting as the Great Unifier
Matting does more work than most buyers realize. A generous mat, typically 2 to 3 inches on all sides, gives every portrait the same visual weight regardless of frame size. It also separates the image from the frame so the eye reads the portrait first and the frame second. When portraits were shot in different settings, a consistent mat and a consistent frame color can make them feel like they belong together even when the backgrounds do not.
A Quick Reference for a Mixed Wall
| Element | Keep consistent | Can vary |
|---|---|---|
| Frame color family | Yes | |
| Frame finish | Yes, within one color family | |
| Frame size | Yes, within 2 to 3 steps | |
| Mat width | Yes | |
| Subject mood | Yes, if one color tone repeats | |
| Portrait orientation | Yes, if the layout balances it |
When to Break the Rules
A senior's portraits are personal, and a wall that feels too controlled can feel cold. If one portrait means more than the rest, give it a larger frame and a slightly different finish, and let it be the exception. One deliberate exception reads as a choice. Several read as a lack of one.
Booking Your Senior Portrait Session for the Wall
A wall of portraits starts with the session. Plan the session with the wall in mind. Choose poses, outfits, and backgrounds that will look good in the frame sizes you have chosen.
Swartz Portraits photographs high school seniors in a private, application-based session. Each session runs up to five hours, with unlimited outfit changes and multiple locations. Proofs are revealed in person 7 to 10 days after the session. Museum-quality prints, albums, and wall art are handcrafted in Italy by GraphiStudio.
Swartz Portraits serves Conroe, Spring, The Woodlands, Tomball, Cypress, and the greater Houston Metro. The studio accepts 100 seniors per year, with no more than 8 from any single high school, so planning early helps.
Schedule your free in-home consultation.
Frequently Asked Questions
How do you arrange portraits on a gallery wall?
Start by laying the frames on the floor in the arrangement you want, then transfer that layout to paper or a digital preview. Anchor the wall with one larger focal portrait, place smaller frames around it, and keep a consistent gap between each frame. Check the composition from a few steps back before any nails go into the wall. This approach works especially well for high school senior portraits, where one strong image can lead the eye across the whole display.
How much space should you leave between frames on a gallery wall?
Most designers recommend keeping the gaps between frames consistent, typically two to three inches, so the arrangement reads as one unit rather than separate pictures. Tighter spacing suits a grouped, salon-style wall, while wider spacing gives each portrait room to breathe. Whatever gap you choose, use it across the entire wall. Consistent spacing does more for a polished look than any particular measurement.
How high should you hang framed portraits?
Hang the center of the arrangement at roughly eye level, which is usually around 57 inches from the floor. For a gallery wall, measure the center of the whole grouping rather than each frame individually. If the wall sits above furniture, leave about six to eight inches between the top of the furniture and the bottom of the lowest frame so the pieces feel connected to the room.